How to Take a Screenshot on a Mac
Whether you are looking to capture a funny moment, a specific error, or save a memorable image, knowing how to take a screenshot on your Mac is an essential skill. macOS provides several easy methods to take screenshots, and this Aaculaax guide will walk you through each method step-by-step. We will also cover how to find your screenshots, change where they are saved, and provide tips on editing them.
1. How to Capture the Entire Screen
Capturing the entire screen is useful when you need a record of everything visible on your display at one moment.
Step 1: Prepare your screen. Make sure whatever you want to capture is clearly visible on the screen.
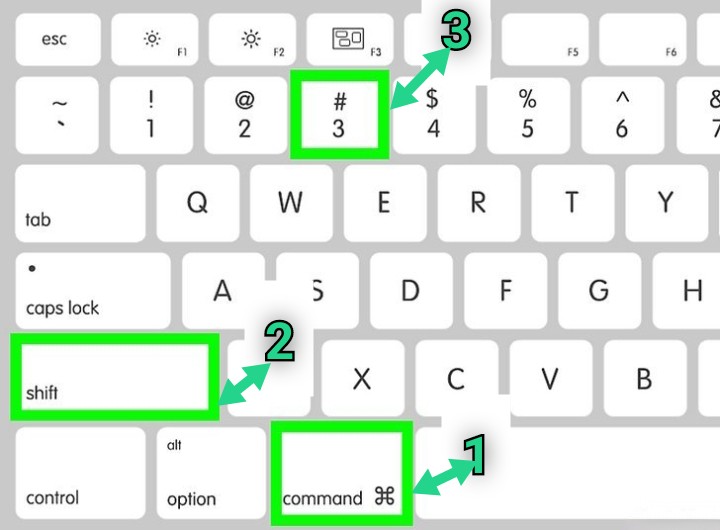
Step 2: Press and hold the Command (⌘) + Shift + 3 all at the same time. This keyboard shortcut will take a snapshot of your entire screen.
Step 3: Release the keys. You will hear a shutter sound (if your sound is on), indicating that the screenshot has been taken successfully.
Step 4: Locate the screenshot. By default, the screenshot will be saved to your desktop, named as “Screen Shot [date] at [time].png”.
2. How to Capture a Selected Portion of the Screen
Sometimes you might want to capture just a part of your screen. This method gives you control over the area to be captured.
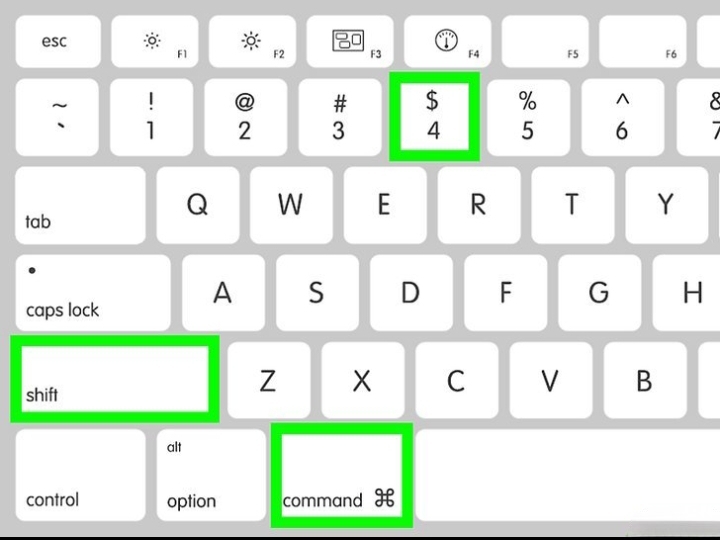
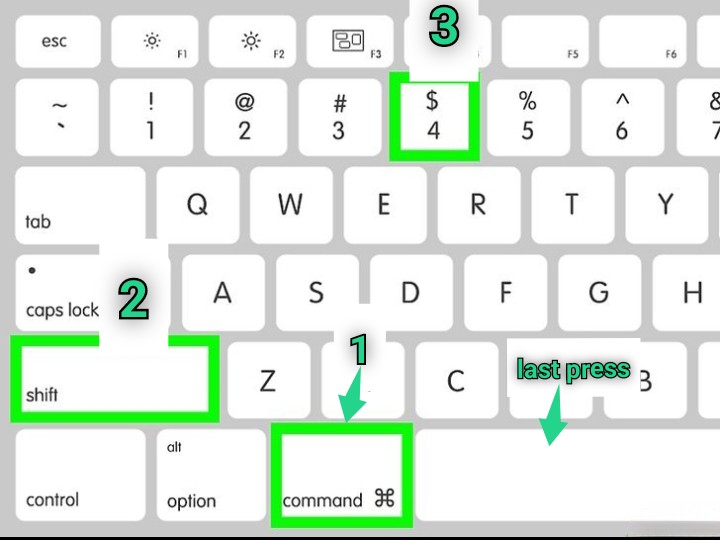
Step 1: Press and hold Command (⌘) + Shift + 4. Your cursor will change to a crosshair.
Step 2: Click and drag the crosshair to select the area of the screen you want to capture. Start at one corner of the area and drag to the opposite corner. As you drag, you can hold Shift, Option, or Spacebar to adjust the shape and position of the selection area.
Step 3: Release the mouse or trackpad button to take the screenshot. If you need to cancel the action, press Escape (Esc) before releasing the button.

Step 4: The screenshot will be saved automatically to your desktop. The file will be named “Screen Shot [date] at [time].png”.
3. How to Capture a Specific Window
If you need a screenshot of a single window, follow these steps to capture it without any background distractions.
Step 1: Press and hold Command (⌘) + Shift + 4. After pressing these keys, immediately press the Spacebar.
Step 2: The cursor will change to a camera icon. Move this camera icon over the window you want to capture. The window will be highlighted automatically.
Step 3: Click your mouse or trackpad to capture the highlighted window. If you decide not to take a screenshot, you can also press the Escape (Esc) key to cancel.
4. How to Capture a Menu
Capturing menus can be tricky, especially if they close automatically when you try to initiate a screenshot.
Step 1: Open the menu you want to capture.
Step 2: Press Command (⌘) + Shift + 4, and then the Spacebar. This changes the cursor to a camera.
Step 3: Highlight the menu by hovering the camera icon over it. Ensure the menu remains open.
Step 4: Click to capture the screenshot of the menu.
Step 5: Like other methods, the screenshot will be saved to your desktop as “Screen Shot [date] at [time].png”.
5. Using the Screenshot Toolbar
The Screenshot Toolbar in macOS offers additional functionalities, such as screen recording and more flexible screenshot options. Here’s how to use it:
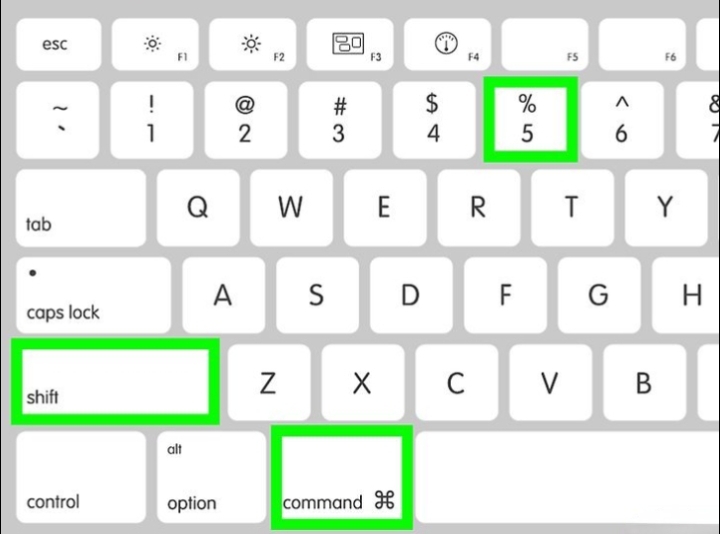
Step 1: Press Command (⌘) + Shift + and 5. This will bring up the Screenshot Toolbar at the bottom of your screen, displaying various controls.
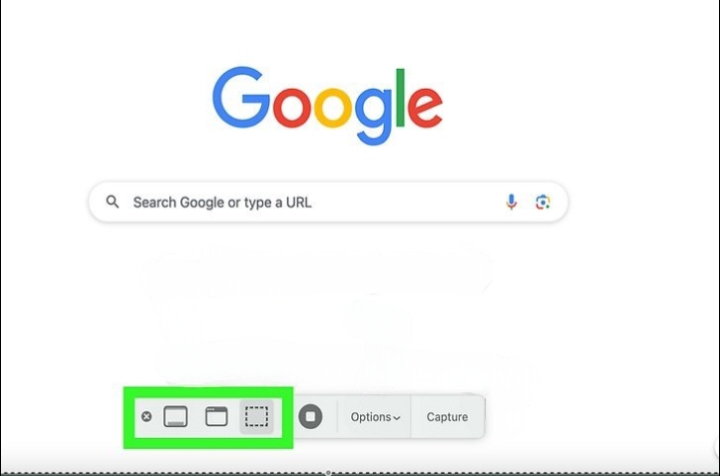
Step 2: You will see options to capture the entire screen, capture a selected window, capture a selected portion of the screen, record the entire screen, or record a selected portion of the screen. Choose the appropriate icon based on your needs.
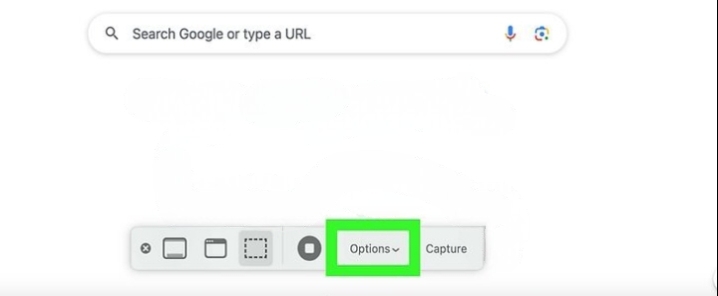
Step 3: Once you select an option, you can click on “Options” in the toolbar to choose where to save the screenshot, set a timer if you need a delay (useful for capturing dropdown menus or other temporary items), and decide whether to show the mouse cursor in the screenshot.
Step 4: After setting your preferences, click on the screen or drag to select the area you want to capture or record. For screenshots, the file will save automatically after the capture. For recordings, you can stop the recording from the menu bar at the top of your screen.
6. Editing Screenshots Immediately After Capturing
macOS allows you to quickly edit screenshots immediately after taking them, which is very convenient for adding annotations, highlights, or cropping the image [1].
Step 1: As soon as you take a screenshot, a thumbnail of it will temporarily appear in the bottom right corner of your screen. Click on this thumbnail before it disappears.
Step 2: The screenshot will open in a preview window with various editing tools. You can crop, rotate, add text, draw, highlight, and more.
Step 3: After making your edits, click on “Done” to save the edited screenshot. You can also choose to share it directly from this window to email, messages, and other apps.
7. Changing the Default Save Location of Screenshots
If you frequently take screenshots, you might want to organize them better by changing the default save location.
Step 1: Open the Screenshot app by still pressing Command (⌘) + Shift + 5. Alternatively, you can find it using Spotlight.
Step 2: Click on “Options” in the Screenshot Toolbar.
Step 3: Under the “Save to” section, you can choose from several default locations such as Desktop, Documents, Clipboard, Mail, Messages, and Preview. To set a new default location, select “Other Location” and choose a folder where you want your screenshots to be saved.
Step 4: All future screenshots will now be saved to this new location unless you change it again.
Keyboard Shortcuts to Remember
1. Command (⌘) + Shift + 3: Capture the whole screen
2. Command (⌘) + Shift + 4: Capture a portion of the screen
3. Command (⌘) + Shift + 4, then Spacebar: Capture a specific window
4. Command (⌘) + Shift + 5: Open the Screenshot Toolbar
Readers Questions & Answers
1. How do I take a screenshot of my entire screen on a Mac?
To capture the entire screen, press Command (⌘) + Shift + 3. You’ll hear a shutter sound indicating the screenshot has been taken, and the screenshot will automatically save to your desktop, typically named “Screen Shot [date] at [time].png”.
2. What if I only want to screenshot a specific part of the screen?
Press Command (⌘) + Shift + 4, which will change your cursor to a crosshair. Click and drag to select the area you want to capture. Release the mouse or trackpad button to take the screenshot, which will then save to your desktop.
3. Can I take a screenshot of a single window only?
Yes, press Command (⌘) + Shift + 4, then hit the Spacebar. Your cursor will change to a camera icon. Hover over the window you want to capture (it will highlight), and click to take the screenshot. This will also save automatically to your desktop.
4. How do I capture a menu or dropdown menu on my Mac?
To screenshot a menu, first open the menu. Press Command (⌘) + Shift + 4 and then press the Spacebar. The cursor will change to a camera. Hover over the open menu and click to capture. The screenshot will be saved to your desktop.
5. Is there a tool for more screenshot options on a Mac?
Yes, press Command (⌘) + Shift + 5 to open the Screenshot Toolbar. This toolbar offers options to capture the entire screen, a selected window, a selected portion of the screen, and includes options for screen recording. You can also choose where to save screenshots, set a timer, and more.
6. How can I edit my screenshot immediately after taking it?
Immediately after taking a screenshot, a thumbnail will appear in the bottom right corner of your screen. Click this thumbnail to open the screenshot in a markup view where you can crop, rotate, annotate, and edit the image. Click “Done” to save the edits.
7. Can I change the default location where my screenshots are saved?
Yes, using the Screenshot Toolbar (Command (⌘) + Shift + 5), click on “Options” and under the “Save to” section, choose a new default save location from the list or select “Other Location” to choose a specific folder.
8. What if I don’t want the screenshot to save to a file?
If you prefer the screenshot to go directly to your clipboard instead of saving as a file, press Command (⌘) + Control + Shift + 3 (for the entire screen) or Command (⌘) + Control + Shift + 4 (for a portion of the screen). You can then paste it into another application by pressing Control + V key to paste it.
9. Are there keyboard shortcuts for screen recording on a Mac?
Yes, press Command (⌘) + Shift + 5 and select either “Record Entire Screen” or “Record Selected Portion” from the Screenshot Toolbar. Click “Record” to start recording and the “Stop” button in the menu bar to stop.
10. How do I cancel a screenshot while in the process of taking it?
If you’ve initiated a screenshot command and wish to cancel it, simply press the Escape (Esc) key before completing the action.
Conclusion
So, that’s all! With these steps, you can capture anything that is happening on your Mac’s screen. Whether it is for work, a project, or just to save something cool you see online, knowing how to take a screenshot is a handy skill.


0 Comments